This is a post long overdue. I have been running a Raspberry Pi with Raspbmc for weeks now and it has been working beautifully. There were some hiccups initially but most of them are now solved. I intend to cover some of them today in this post. If you are in a hurry, jump straight to the details.
Life before Raspberry Pi
I bought my 42” TV at the turn of the new year (2013). I consciously decided against the purchase of a TV subscription, mainly to avoid the low quality time waste typical of regular channels. There are very few shows I watch, most of which don’t run on channels in India. It seemed like a waste of money to go that route. In other words, I did not buy a TV but a 42” screen with a USB port.
The TV came with really horrible software, but I made do with it for a couple months. It wouldn’t play movies longer than about 2 hours. The interface was really slow and convoluted. Buttons didn’t do what you expected them to do and so on. I didn’t want to invest in an expensive player and I kept an eye out for boxes like these:
Finding Raspberry Pi in Bangalore
That is when I came across Raspberry Pi. I looked it up and to my delight, I found that it was available in Bangalore. I roamed SP Road that day searching for this but found hardly anyone who had even heard about it. I had read it was available in a particular store and after an exhaustive search I found Lakshmi Electronics. It is quite difficult to spot.
Start from town hall side of SP Road and walk in. Walk for some distance passing several computer shops and a few electronics shops until you come to ‘Vishal Electronics’ on your left side (ask for them, they are well known on SP Road). They sell R-Pi too but I found them very costly (~ Rs. 500 more).
You will find a small passage exactly opposite Vishal Electronics. Go in the passage. Lakshmi Electronics will be 2nd shop on your right.
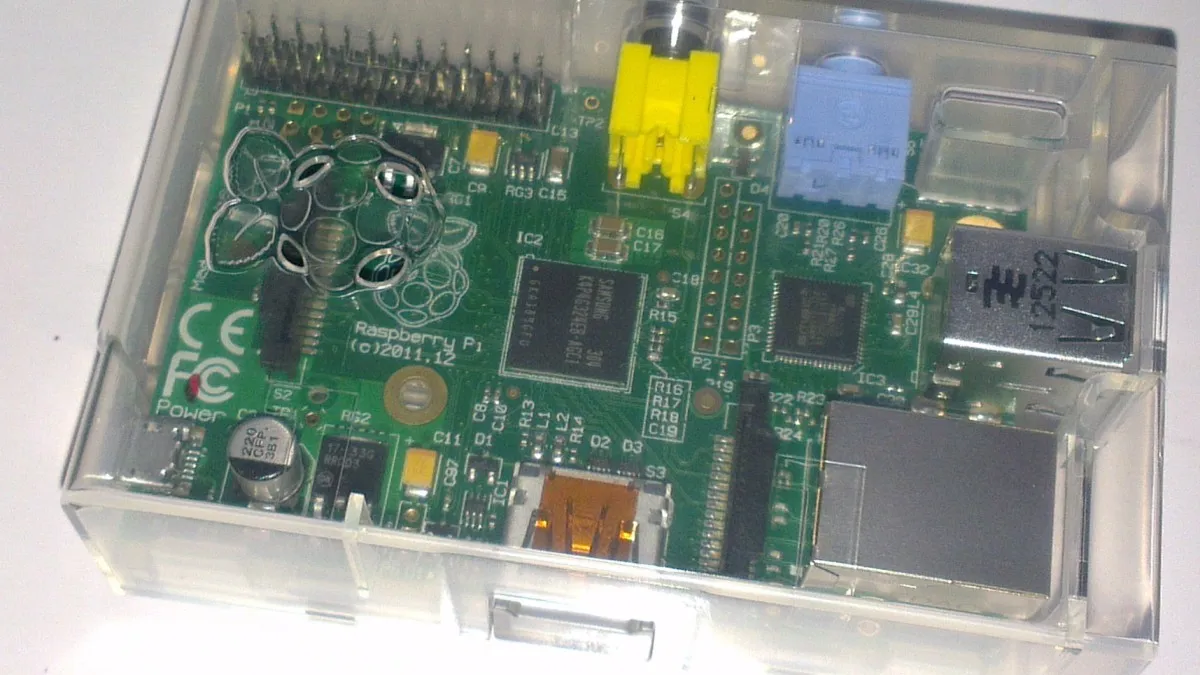
Unfortunately, they didn’t have it in stock then but were expecting it that evening. She gave me a rough cost of Rs. 3,500 for the device with case (as you can see in the photo at the top of the post). I left hoping to go back the following week but couldn’t.
Eventually, I ordered it from a website. I had the device in the nice transparent case I wanted in about a week. It was about the same price after including tax and shipping.
[ad name=“Google Adsense, 300x250, created 2/24/10”]
Accessories
I started searching for accessories necessary to run R-Pi the same day I received it. I would have started earlier but I was not sure of all the connectors necessary and wanted to have the device in hand when I shopped for cables and cards. This includes:
- Power Supply
- Powered USB hub (optional)
- SD Card - Class 10
- Spike Buster (necessary in Bangalore)
- LAN cable (optional)
I was also looking for WiFi adapter, remote and a nice keyboard + mouse but gave up on them. LAN cable sufficed instead of the WiFi adapter. I couldn’t find the remote and didn’t need the keyboard or the mouse.
[gallery ids=“938,939,940,941,942,943”]
As expected, I started looking for this too on SP Road. The hardest was the USB hub. Most shops had not even heard of the powered hub. My options were limited and so it was even more difficult. The trick is to have the hub with the required power rating as Raspberry Pi can’t supply enough power necessary for most USB devices to work.
The only device on the verified peripheral list that I found was the 4-port Belkin powered hub. I found it in a couple of shops but they didn’t have any of the other items to my liking. I eventually returned to my favourite place in 4th block, Jayanagar. I found the Belkin hub, Transcend 16 GB Class 10 SD card, Belkin spike buster, 10m LAN cable, for a total amount of Rs. 2,600. With R-Pi, the total came to Rs. 6,100.
You would have noticed that I didn’t buy a power source. Actually, with the Belkin hub, I didn’t need to. As it turns out, the USB hub can power the device itself over a backfeed. You can see the setup in the photo below. Really nifty!
[caption id=“attachment_942” align=“aligncenter” width=“300”]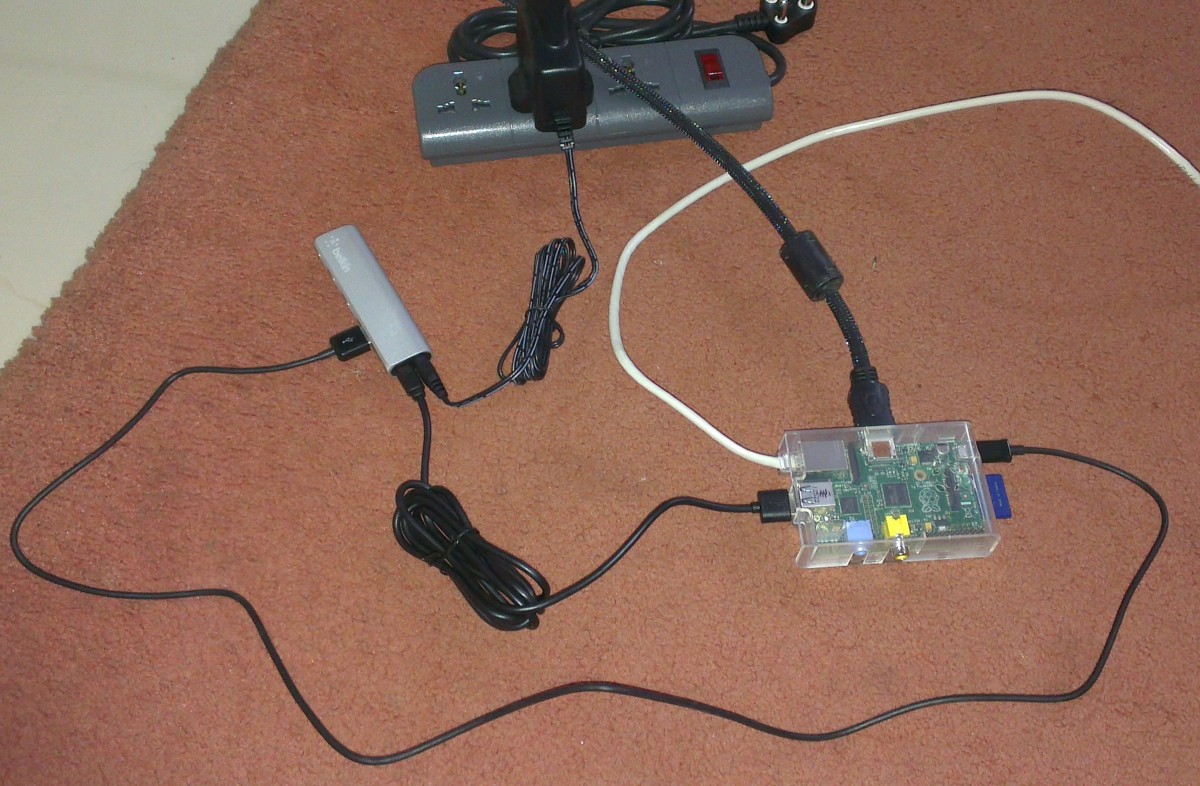 Wire arrangement of all components - You can see that USB hub receives power from the spike buster and its main connection from R-Pi. In turn, the USB hub connects back to the power socket of R-Pi.[/caption]
Raspbmc
Now comes the fun part. I looked up on a few articles and decided to try Raspbmc. Other setups such as Raspbian + XBMC and OpenElec were possible too but Raspbmc seemed much simpler. I put the SD card in my Linux laptop and followed instructions to install on the Raspbian website. This part hardly took 10 mins. The installation setup downloaded the image and set it up on the SD card. Once done, I put the SD card in R-Pi and booted. It worked!
I knew it was to take some time to set it all up and I switched off my TV and left for 30 mins. When I switched it on, I had the main XBMC screen waiting for me.
Configuring XBMC
This is general to xbmc but I am putting it here for completeness. I intended to serve all videos from my main computer. Given my scattered file structure, it was really difficult to get xbmc working naturally. I could, of course, view videos using the file browser but what’s the point?!
I had to restructure all movies to be within one folder and the same for TV shows. Luckily, xbmc supports sources with multiple paths and so I did not have to move all the files across partitions, at least. You have to make sure that admin shares are enabled on your system (such as D$, G$, K$, yes, I have that many). I added those admin shares to the file manager in xbmc. After this step, I created a new source and added paths like D$\Movies, G$\Movies, etc… to that source.
That was it to get it scanning. It was still not accurate in my case as the file names were vague. It detected the files as completely different movies. I used The Renamer to rename all the video files. It was a tough exercise with all the really confusing options, but I eventually got it working. Read more on XBMC naming conventions.
Update
The system has been working great since then. I decided to put in some time to update it today. Not easy! I will write more about it in another post.